MP4Cam2AVI - MPEG4/MJPEG to .AVI converter/joiner for digital cameras
Overview |
Quick guide |
User manual |
Download page |
|
International: |
|
Russian page: |
Interface
Program mode: Basic, Expert

Basic mode |
Video re-coding options and advanced audio options are not available. For conversion without video recompression. |
Expert |
All options are enabled. |
Main window: File list mode

Main window: Timeline mode
In timeline mode, you can drag-and-drop clips to simple timeline, see detailed description below.

1. Left pane |
Select directory with source clips, set source file(s) extension, select files you want to convert (join) to avi. You can convert files directly from USB card-reader In this case, you should attach card-reader before starting MP4Cam2AVI. Slow card-reader (PCMCIA or USB 1.1) may significally slow down conversion speed. |
2. Middle pane |
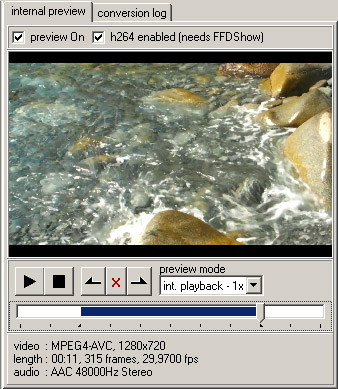
Preview source clips before converting/joining. MP4Cam2AVI makes MPEG-4 ASP and MJPEG preview using xvidcore.dll (from XviD codec) and internal MJPEG decompressor. If you have FFDShow installed, you can also preview H264 clips. File information (below preview) shows you video format (MPEG-4 ASP, MJPEG, H.263 etc.), audio format and file length. |
3. Right pane |
Select action - what you want to do - just convert selected clips to avi or convert and join them to one avi file. Configure audio format, additional audio settings (in advanced options), specify target file name and push 'Start'. |
MP4Cam2AVI interface elements are arranged from left to right, in order they should be configured.
Left pane (source files selection)
source directory |
Select drive and directory with source clips. It may be a USB card-reader (but, in this case, you should attach it before starting MP4Cam2AVI). |
||
source files |
Set source clip(s) extension |
||
file list mode |
MP4Cam2AVI has two modes for input file selectioin - file list mode and limeline mode.
|
||
timeline mode |

In timeline mode, you can drag-and-drop clips to the simple timeline (timeline appears, when the 'timeline mode' tab is active). - To add clips to the end of timeline. just drag them to the
empty space at the end of timeline, or use '>>' button
To save timeline, click 'save' button, by default it will be saved to 'TimeLine.asx' file in the same directory. You can also add files from different directories. ASX is Windows Movie Player playlist format, so you can alsp watch it as a playlist in WMP. |
||

Middle pane (preview, log and progress bars)
internal preview |
|
||
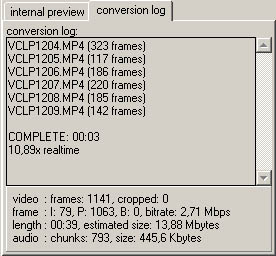
conversion log |
|
||
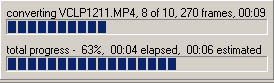
progress bars |
|
 buttons to set the selection area
(frames outside the selection will be cropped). This selections are saved with the timeline.
buttons to set the selection area
(frames outside the selection will be cropped). This selections are saved with the timeline.
Right pane (target file/directory, conversion settings)
action |
Select what you want to do: a) Many -> Many AVI (just convert files, each source clip to separate avi)
|
video format |
Only available in Expert mode By default, video is not recompressed (Source video), this is much faster and causes no video quality loss. If you want to recompress video to XviD MPEG-4 ASP, select one of the 'XviD MPEG-4' options. If source video is MPEG-4, you shold check 'enable MPEG-4 recompression' in advanced settings to perform operation. If you are familiar to XviD settings, you can select 'XviD MPEG-4 ASP (user-configurable)' and configure codec n advanced options. Video recompression is supported only for MJPEG and MPEG-4 ASP source video. |
audio format |
Set target file audio format: 'Source audio' - audio is not recompressed, but be careful with AAC input sound - target avi files may not be compatible with hardware DVD-MPEG4 players and video editing software. This option won't work with Sony M1/M2 and some other cameras, use it for preview only. To edit avi files with avi editing apps, use PCM audio option. This will increase target avi file size, but it's safer for correct audio/video sync. For playback on PC or DVD-MPEG4 players use MP3, High quality is recommended. |
use advanced options |
Check this option to configure advanced settings (additional video and audio processing options). When unchecked, advanced options will be ignored. |
advanced options |
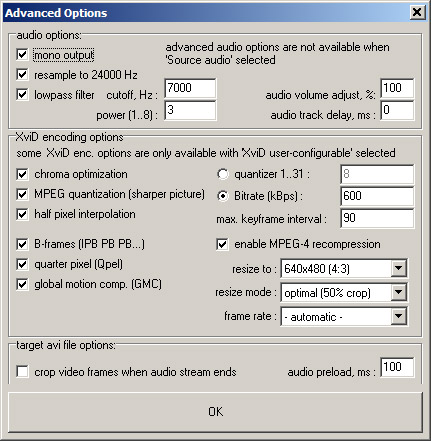
Only availabe in Expert mode Push this button to configure advanced options.
Some options may be greyed, it depends on other settings.
AUDIO OPTIONS: Not available when 'Source audio' option selected mono output - dowmix channels (usefil for Olympus C770 with stereo audio track, wich is actually mono due to mono internal mic) resample to 24000 Hz - resample source audio using spline interpolation algorithm. If source sample rate is 48000 Hz, use it to smaller file size, with minimal loss of quality. If source sample rate is about 8000 Hz and you use to prevent audio quality loss (lame mp3 codec works better with higher sample rates). lowpass filter - use it to cut off some high frequencies, when sound is too 'hard' (useful for Sanyo Xacti cameras). The lower is the CutOff is frequency, the softer sound will you get. The power parameter defines CutOff efficiency. But, with high values you can get 'ringing' sound, so use power from 2 to 4. audio volume adjust, % - set value greater that 100 if source sound is too quiet, but be careful, you can get audio volume 'overload'. audio track delay, ms - use in to shift audio track forward (positive values) or backward (negative values) in milliseconds. Useful for cameras with audio lag, like Minolta A200.
XviD ENCODING OPTIONS: XviD Encoder options are available only with video format 'XviD MPEG-4 User conigurable'. With other 'XviD MPEG-4 *' options, they are filled with predefined values and greyed out. enable MPEG-4 recompression - check it if you want to recompress MPEG-4 video (you should know what you are doing - it causes video quality loss and it's much slower)
TARGET AVI FILE OPTIONS: crop video frames when audio stream ends - when checked, MP4Cam2AVI will crop video frames 'not covered' by the audio track (for example, in Sanyo Xacti C1 clips audio track is ~50ms shorter, so 1-2 frames will be cropped at the end of each clip). When unchecked, MP4Cam2AVI will insert 'silence' at the end of each clip, so video and audio durations will be equal. audio preload value sets how audio and video data is written to target avi file (usially, audio is coming a little earlier, so player can cache it up). If you have problems playing target avi on your DVD-MPEG4 player, try to increase this parameter (default value is 500). |
target file |
Set target file (for 'Many -> One AVI' Move) or target directory (for 'Many -> Many AVI' mode) |
avi size limit |
Maximum target avi size (for 'Many -> One' mode only). AVI file can't be larger than 2Gb (this is format limitation), but, some DVD-MPEG4 players don't understand avi files larger than 1Gb, so it's safer to use 1Gb avi size limit. When this limit exceeds, MP4Cam2AVI creates next volume automatically (i.e. OutFileName.01.avi, OutFileName.02.avi etc.) |
align to clip start |
When checked, program will try to create next volume on new clip start, so, input clips won't be divided between volumes. When unchecked, program will start next volume on the nearest keyframe. |
thread priority |
Set it to 'Lower' or below to perform conversion in background (while working with some other app). |
Prompt to overwrite |
Show confirmation dialog when target file already exists. |
Program settings
MP4 Trak ID -> AVI FourCC mapping
[Main menu] -> [Settings] -> [MP4 Trak ID -> AVI FourCC mapping]

This table helps MP4Cam2AVI to recognize input video format and sets appropriate target AVI FourCC for each video format.
In most cases, you don't need to change these settings, change them
only if you are familiar to MP4 and AVI container format.
External apps (preview and edit)
[Main menu] -> [Settings] -> [External apps (preview and edit)]

External player - tells MP4Cam2AVI what player to use when you:
- double click the file in the list;
- push 'Play' button with [preview mode]='- external player -';
- press Ctrl+V to open target *.avi file;
VirtualDub location - tells MP4Cam2AVI where VirtualDub (VirtualDubMod) is located,
if you have one :). You can push Ctrl+E in MP4Cam2AVI to open target file in VirtualDub;
© Mikheev Oleg 2004-2011; All Rights Reserved
e-mail: graywolf2004@mail.ru
KEYWORDS: mp4 (aac) to avi (mp3) conversion, digital mpeg4 camcorders, freeware and open source mp4 to avi converter, mp4 to avi conversion and joining tool with no video recompression, direct stream copy mov to avi convert, mov2avi, mp42avi, mp4toavi, pass mp4 to avi, quicktime to avi, mp4 file problem, how to edit mp4 files, convert nero mp4 to DivX.